Threw together a few video clips I had on my phone.
http://www.youtube.com/watch?v=Zh4grSFj0vc&sns=em
Tuesday, December 30, 2014


Tuesday, November 18, 2014
A quick update for you

Btw..the very first (and only) distance race we did with her this year ('Round Whidbey) we placed Second. We've since made some tweaks and continue to dial her in and are hoping for First place next year!


Monday, November 12, 2012
Officially Christened!

Vertigo was officially christened October 21, 2012. It was a fun party with family and friends all celebrating the completion on the boat. We had music, food, champaign, and of course..fireworks! It also included a small service with a blessing and official smashing of the champaign bottle on the bow pulpit. A great time was had by all!
Monday, October 15, 2012
Vertigo Christening
Hey Guess What...Vertigo is nearly done. I know the blog doesn't show her as being done yet, but that's because I'm a lousy blogger and am perpetually behind in updating it. I will in time fill in the missing pieces. Anyway...she is off the cradle and onto a trailer. This weekend we will be rolling her out of the shop and stepping the mast. We will then be having a Christening party here at the house for her. (Oct 21st) If anyone is interested, come on by for the party. Just shoot me an email and I'll give you details and directions. The plan is (weather permitting) to launch her sometime next week and do some sea trials, then back to the shop for any necessary changes. Stay tuned! :)
Wednesday, September 19, 2012
Attaching the Bulb


 After bolting on the bulb, I made an epoxy fillet which I then reinforced with glass and carbon fiber.
Sunday, August 5, 2012
Playing with Molten Lead

 The keel came out of the molds and looked prettty nice. This picture shows the top and bottom halves put together. (but it's actually upside down here) The weight came out to 550 pounds...which, suprisingly, was what I was hoping it would be! I love it when a plan comes together!
 Picture of a very happy me getting ready to chisel off the ridge where the two halves meet. Later I faired the bulb with compound...but it didnt need much.
Thursday, May 10, 2012
Recycling!

Monday, April 2, 2012
Pulpit and Lifelines


 For lifelines, I decided to go with Amsteel by Samson. Its super tough stuff and easy to work with. Here's my eye splices at the back of the boat. They are then lashed to the rear stanchion. This way I can easily adjust the tension of the lifelines.
Tuesday, January 10, 2012
Making the Rudder Fast!


Friday, December 2, 2011
A New Rudder

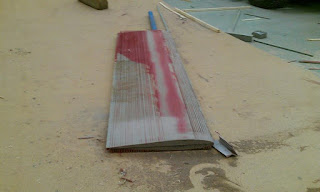 I used the same technique for shaping this blank as I had the pink foam one. I used a template to trace the shape of the NACA foil on the end of the blank. Then I repeatedly ran it through the table saw adjusting the blade each time for the correct depth to correspond to the foil shape. I then sprayed is red and sanded down to the red refference lines that were made. Again, this worked really well. Just a bit awkward with the weight of the stainless post on one end.
Tuesday, October 18, 2011
Painting The Hull

 To paint the hull, I used Interlux Perfection. It is pretty awesome stuff. Unlike the topside paint, it is just a single part paint. I applied it using a foam rubber roller. It took me a few coats before I really figured the stuff out. The key is to do only a couple square feet at a time. After applying a couple square feet, I learned that by rolling it again super lightly that this would "tip" the paint and cause it to lay down nice and flat. Then, whatever you do, dont try go back and fix anything, just move to the next section...and be quick about it or the sections won't blend! I ended up with at least 5 coats. The only problem is this stuff is so glossy and shiny that any little ripple or bump is easy to see and I found myself wishing I'd spent a few more weeks fairing the hull! But overall, it looks really nice. Unless you get within a foot of it and really examine it, it looks like it was sprayed. And hopefully out on the water, no one is ever that close to the boat!

Thursday, September 1, 2011
Monday, August 1, 2011
The Main Hatch


I built the hatch out of 3/8 plywood covered on both sides with a couple layers of carbon fiber. This was to make it stiff and strong and to keep it from warping. (plus I just think CF looks cool!) While I was at it, I also built the support beam for the traveller. It is a ply U-beam which I also covered in layers of carbon.
 The hatch fit really nicely. I then bonded an rubber seal around the inside perimeter of the hatch. When the hatch is closed, the seal is compressed providing an excellent seal. Later I changed out the hinges for ones that slip apart allowing for easy removal and stowage of the hatch
 I also changed the hatch handles a bit. The new ones seem to work really well. I'm pretty sure that with this settup I should be able to lock things up pretty tightly if things start getting a bit sketchy out on the water!
Thursday, July 14, 2011


Friday, March 11, 2011
Mast Compression Beam

A Step In the Right Direction

Started work on the mast step. Laminated multiple layers of marine ply and then cut the wedge shape. Next I used a belt sander to contour the underside to the shape of the hull. To get it to conform perfectly, I plan on bedding it in thickened epoxy. The mast step is stainless steel and is hinged (which should make stepping and un-stepping the carbine fiber mast an easy job!)
What I Think About A Sink

It's been a while since my last post, but I have been working a bit on the project now and then. Just been busy with the family and working. But I did manage to install the chainplate supports for the mast shrouds. Hopefully they are in the right place (or at least close enough!) I ended up finding some Melges 24s sitting on trailers in Seattle and did some measuring. I then used my boats dimensions and did some interpolating and came up with these chainplate locations. I think this should work, I just always get a little nervous about my calculations! As you can see in this picture, I also made the storage cutout in the sink pedestal as well as put in the "sink" The "sink" is actually just a really deep plastic salad bowl. On my current boat, I almost never use the sink. When I do use the sink it is a pain to drain because I have to reach below and open a sea cock (which is normally closed to prevent it from flooding the boat when we are heeled) It also seems that gooey nasty stuff is always clogging the drain. And also having a hole in the hull means there's always a chance something could break, and the boat sinks. For simplicity, I'm using a bowl that easily pops out and it's contents thrown out the main hatch..overboard. No worries about sea cocks, plugged drains, or sinking!

A picture of the port chainplate support structure.
Wednesday, February 2, 2011
Sink Pedestal

 Today I was able to seal up the starboard bench and rough frame the sink pedestal. Once this pedestal is finished, the only other major interior structure is the aluminum mast compression post. Then comes all the sanding and painting inside.
Added Flotation!

 Some people have suggested that I fill some of my compartments with foam for some reserve buoyancy. So in the interest of safety I added some foam today.
Right below the companionway door, there are two compartments formed by the floor grid. I've decided that rather than sealing these up, I'll use them as storage. One will be for tools, and dock lines, etc. But the other more important one I decided to make into an ice box. This way when we are racing (and are bored after passing everyone :)), we can just reach through the door into the cabin and grab the cold beverage of our choice. It was kind of a fun little project, although my boat is now full of little tiny foamy balls that flew everywhere when I was cutting the foam panels to shape. I then glassed the panels, then filleted and taped all the corners. I will add lids to these compartments later on.
Sunday, January 30, 2011
We Have A Floor!


Yesterday, I cut the other floor panel and glued them down. It is one solid floor! I think I've succeeded in building a floor/grid structure that will be able to absorb the mast and keel loads while remaining lightweight. I also ran the vent lines for the water tanks and added another coat of epoxy in the tanks and then sealed them up by adding the floor panels above. I used 3/8 ply for this because putting down this floor creates the top to a box beam that holds the keel box. These pics also show the port sitting bench getting prepped for it's top as well. As the grids get covered with floor panels, I'm starting to see that I have quite a bit of room inside. Not exactly a luxurious cruiser, but still lots of room for gear and for camping. (especially for a sportboat) The quarter berths are nearly 6.5' long. I also measured and I found I have 4'2" of headroom. Can't walk around, but with the open floor plan and benches, it will have plenty of room to get out of the weather, change clothes, take a nap, or cook some ramen.

Subscribe to:
Posts (Atom)