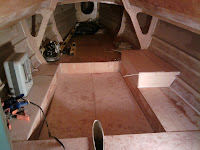
 Today I was able to seal up the starboard bench and rough frame the sink pedestal. Once this pedestal is finished, the only other major interior structure is the aluminum mast compression post. Then comes all the sanding and painting inside.
Wednesday, February 2, 2011
Sink Pedestal
 Today I was able to seal up the starboard bench and rough frame the sink pedestal. Once this pedestal is finished, the only other major interior structure is the aluminum mast compression post. Then comes all the sanding and painting inside.
Added Flotation!
 Some people have suggested that I fill some of my compartments with foam for some reserve buoyancy. So in the interest of safety I added some foam today.
Right below the companionway door, there are two compartments formed by the floor grid. I've decided that rather than sealing these up, I'll use them as storage. One will be for tools, and dock lines, etc. But the other more important one I decided to make into an ice box. This way when we are racing (and are bored after passing everyone :)), we can just reach through the door into the cabin and grab the cold beverage of our choice. It was kind of a fun little project, although my boat is now full of little tiny foamy balls that flew everywhere when I was cutting the foam panels to shape. I then glassed the panels, then filleted and taped all the corners. I will add lids to these compartments later on.
Sunday, January 30, 2011
We Have A Floor!
Yesterday, I cut the other floor panel and glued them down. It is one solid floor! I think I've succeeded in building a floor/grid structure that will be able to absorb the mast and keel loads while remaining lightweight. I also ran the vent lines for the water tanks and added another coat of epoxy in the tanks and then sealed them up by adding the floor panels above. I used 3/8 ply for this because putting down this floor creates the top to a box beam that holds the keel box. These pics also show the port sitting bench getting prepped for it's top as well. As the grids get covered with floor panels, I'm starting to see that I have quite a bit of room inside. Not exactly a luxurious cruiser, but still lots of room for gear and for camping. (especially for a sportboat) The quarter berths are nearly 6.5' long. I also measured and I found I have 4'2" of headroom. Can't walk around, but with the open floor plan and benches, it will have plenty of room to get out of the weather, change clothes, take a nap, or cook some ramen.
Back from Hawaii!

 Aloha! Back from a wonderful family vacation on Maui. I've had a bit of time to dedicate to the boat project again. I know these pics are kind of looking the same..but look closer and you can see progress is being made. The work has been a bit tedious but productive non the less. I have been reinforcing the floor grid, turning it into a system of i-beams, adding glass, and preparing it to receive the floor panels. It's involved a lot of gluing and clamping small pieces of ply, and a lot of filleting in weird little tucked away corners. I also decided to do some plumbing. Around here in the northwest, for some of our distance racing, we have to comply with PIYA regulations. One of the regs is to have permanent water tanks installed in the boat. I've decided to make the tanks in the area on either side of the keel. This keeps the water's weight down low and near the center of the boat. Also, with this setup, I'll have two independent tanks so that if one leaks out, I still have another one. I ran 3/8" pex piping from the tanks under the floor area to the galley area where I will later hook them to a tank selector and a hand pump.
Tuesday, January 11, 2011
She's Got Some Sole!
I've been busy with work lately but this week I did manage to reinforce and glass in the floor and keel area. I added some stringers and also the vertical faces of the benches. With this added structure, the bottom of the boat is totally stiff and strong. I was also able to cut out and losely fit part of the floor sole. I will need to do a bit more reinforcing before I'm ready to put down the sole. I will be taking a small break from the boat project for a couple weeks as I'm taking the family to Hawaii!
Sunday, January 2, 2011
Happy New Year!!!
Happy New Year everyone!! Hopefully 2011 will be the year Vertigo get's to go sailing! Christmas time is always busy for our family but I still managed to squeeze in some time here and there to keep the boat project moving forward. These are some pictures of the grid structure I've been working on. These structures will support the keel loads as well as the load from the mast. I'm really happy with how everything is coming together and how stiff the floor area is getting. This first picture is looking forward. The floor area around the aft part of the keel box will be at the level of the aft berths. Then forward of this
area the floor drops about 6 inches. Along each side of this lower area there will be benches that run from the aft berths to the v berth area. Although you can't stand in this boat, the benches will allow for very comfortable sitting headroom. Also along the starboard bench up at the v-berth will be a small sink and a place to hang my new jet-boil camping stove I got for Christmas!
area the floor drops about 6 inches. Along each side of this lower area there will be benches that run from the aft berths to the v berth area. Although you can't stand in this boat, the benches will allow for very comfortable sitting headroom. Also along the starboard bench up at the v-berth will be a small sink and a place to hang my new jet-boil camping stove I got for Christmas!
Thursday, December 16, 2010
A Place to Hang My Keel
So after all my floating, and recalculating, I ended up locating the keel box right where I had originally calculated it would be. Which was great since I had already installed the main cross beam which now intersects the keel box perfectly! I was still a bit nervous cutting that hole in the hull though...mainly because yesterday it floated so well, it just seemed a shame to put a hole in it! The tricky part today was getting the boat leveled in all directions so I could be sure the keel box is installed straight on centerline, and plumb all around. I think I was able to meet most of those criteria so I epoxied it in position.
Subscribe to:
Posts (Atom)


