Friday, December 2, 2011

A New Rudder

I decided the rudder I had shaped from pink insulation foam was nice practice but that I probably needed something a bit more substantial.  So I went to Fiberglass Supply and bought some actual structural foam core material.  I also had my friend Mitch weld up a stainless rudder post which I sandwhiched in between some carbon and the foam.
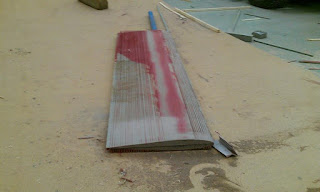
I used the same technique for shaping this blank as I had the pink foam one.  I used a template to trace the shape of the NACA foil on the end of the blank.  Then I repeatedly ran it through the table saw adjusting the blade each time for the correct depth to correspond to the foil shape. I then sprayed is red and sanded down to the red refference lines that were made.  Again, this worked really well.  Just a bit awkward with the weight of the stainless post on one end.

Tuesday, October 18, 2011

Painting The Hull

To paint the hull, I used Interlux Perfection.  It is pretty awesome stuff.  Unlike the topside paint, it is just a single part paint.  I applied it using a foam rubber roller.  It took me a few coats before I really figured the stuff out.  The key is to do only a couple square feet at a time.  After applying a couple square feet, I learned that by rolling it again super lightly that this would "tip" the paint and cause it to lay down nice and flat.  Then, whatever you do, dont try go back and fix anything, just move to the next section...and be quick about it or the sections won't blend!  I ended up with at least 5 coats.  The only problem is this stuff is so glossy and shiny that any little ripple or bump is easy to see and I found myself wishing I'd spent a few more weeks fairing the hull!  But overall, it looks really nice.  Unless you get within a foot of it and really examine it, it looks like it was sprayed.  And hopefully out on the water, no one is ever that close to the boat!

Monday, August 1, 2011

The Main Hatch

I figured that with an unproven, homemade boat design, it would be important to have a watertight hatch with some sort of positive locking mechanism.  The first thing I did was to bond a ringframe around the opening.  This would provide the hatch with a nice area to recess into.

I built the hatch out of 3/8 plywood covered on both sides with a couple layers of carbon fiber.  This was to make it stiff and strong and to keep it from warping. (plus I just think CF looks cool!)  While I was at it, I also built the support beam for the traveller.  It is a ply U-beam which I also covered in layers of carbon. 


The hatch fit really nicely.  I then bonded an rubber seal around the inside perimeter of the hatch.  When the hatch is closed, the seal is compressed providing an excellent seal.  Later I changed out the hinges for ones that slip apart allowing for easy removal and stowage of the hatch
I also changed the hatch handles a bit.  The new ones seem to work really well.  I'm pretty sure that with this settup I should be able to lock things up pretty tightly if things start getting a bit sketchy out on the water!

Friday, March 11, 2011

Mast Compression Beam

The compression post is installed.  Now some of you may recall I mentioned planning to install an aluminum post.  That was my plan.  My friend Mitch even had a heavy duty thick walled piece of tubing for me.  But then I started figuring how I needed to put on some sort of metal end brackets and would have to measure the length perfectly and get the angle right on the first try and would still need some sort of wood block to match the contour of the cabin top.  I decided it would be easier to just build a hollow post out of clear yellow pine.  It ended up being 3"x2.25" and only weighed 3lbs.  I figure it should take around 6500lbs of compression (which is probably more than the floor will! :) so it should be plenty strong.  I was able to use the sander to sculpt the top and bottom to  perfectly match the contours of the floor and ceiling.  This post was the last structural component on the inside of the boat.  Now I need to do a bit more fiberglass reinforcing.  Then it will be time to sand, fair, and paint the inside of the boat.  Making progress!

A Step In the Right Direction

Started work on the mast step. Laminated multiple layers of marine ply and then cut the wedge shape.  Next I used a belt sander to contour the underside to the shape of the hull.  To get it to conform perfectly, I plan on bedding it in thickened epoxy.  The mast step is stainless steel and is hinged (which should make stepping and un-stepping the carbine fiber mast an easy job!)