Friday, October 29, 2010
Getting Rid of That Blank Look!
The pine laminated very nicely to form the keel blank. I then marked the foil on one end of the blank. My plan was that I would run it through the table saw at depths that corresponded to the foil outline--just like I did with the foam for my practice rudder (yeah I've decided that was just a practice rudder...pink foam is just not gonna do the trick!) The difference,however, is that the pink foam weighed nothing, and this plank (even though it's pine) weighs a ton! I tried the table saw thing but trying to push it through by myself with any degree of accuracy was going to be a dissaster! So I decided to bring the saw to the blank by using my skilsaw. This seems to be working great although it takes a while. I'm using a piece of 3/4"ply as a straight edge that I clamp in place. I then set the depth, and make a run down the blank. Then I unclamp, move a quarter inch, reclamp, reset the new depth, and cut again..and repeat..over and over. It's not hard, and seems to be working quite well...it's just a bit tedious and takes some time!
I had a good talk with the guys at Fiberglass Supply yesterday. Matthew was very helpful as I talked about my keel ideas. The guys at FS are totally cool and are always helping me brainstorm stuff. So it turns out that I don't really need to make this keel out of carbon fiber...even though CF is sooo cool! The biggest advantage to carbon is how stiff it is for it's weight. And in certain situations, this is really important. I'm not that concerned about making the keel fin lightweight. So I can use S or even E glass..and just increase my layup schedule to reach the same strength as the CF. It may flex a bit more..but it will still be strong (at less than half the price as CF) Besides, I'm gonna paint the rudder and keel orange(cause orange is fast!) so no one would be able to see the awesome black carbon anyway. I head off to Seattle tomorrow to work a few nights...so probably work on shaping the keel fin some more come Monday.
Tuesday, October 26, 2010
Let The Keel Begin!
Well, today I got to do a bit of work on the boat. I put a couple more coats of gray primer on the hull. This means I now have 4 coats. I think I'll add one more tomorrow.
I also started my journey toward having a keel. The keel for this boat will be a high aspect ratio wood cored carbon fiber fin with a 600 lb lead bulb at the end of it. The foil shape will be the NACA 0012 which from what I've read is a good all around foil for this kind of application. The chord will be about 18 inches with nearly 5 feet of foil between the bottom of the boat and the bulb. When finished, the fin should only be about 2.25 inches thick.
For a core, I'm using laminated clear red pine planking. The core will not be providing much structural strength. It will serve mainly as a rigid spacer between the outside shell of carbon fiber which will bear the bulk of the loadpath.
Tonight I laminated 3 sheets of pine to make a core blank that is 2 inches thick. I've weighted it down on the shop floor while it cures. Hopefully the floor is nice a flat so that the core blank ends up true!
Sunday, October 24, 2010
Banking Some Points!
This past week I did no actual work on the boat. I did however help out the boat cause. Since my wife has been very patient with me working on the boat so much lately, I decided to tackle a project for her (building cabinets/bookshelves) Although it took all my days off, she is very happy and I've built up some currency I can cash on the boat project! Truly a win/win situation!
Friday, October 15, 2010
And More Paint!
So today I did some more painting. I was able to get 2.5 coats of epoxy primer on the hull. I have to say that after all the sanding, it has been really fun to finally paint. My plan now is to finish a few more coats of paint on the hull. Once the exterior is primed, I will focus on working on the inside of the boat..hopefully finish the inside this winter. One of these days I need to use a real camera to take some pictures instead of my phone which kind of distorts things. Also, now that the boat looks all nice, I guess I should give the shop a bit of a cleaning too..of course that means valuable build time wasted!
Thursday, October 14, 2010
On With The Paint!
After locking myself in the shop for days, I've finally finished sanding. It wasn't all that bad. In fact, I filled and faired in about a week more surface area than the bottom of the hull which took about 6 months! (of course that was winter and I had no idea what I was doing!) So I guess I'm learning some things! If I build another boat, I'm thinking it'll take less than half the time!
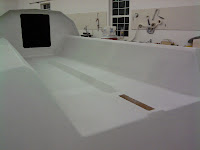
Anyway, I was glad to be done with the sanding and move on to some painting. I'm using a two part epoxy paint (white for the decks and house) These photos show one coat of Interprotect 2000E. It rolled on very smoothly. I plan to do 3 or 4 coats of white on the topside, and 4 or 5 coats of gray on the hull. Starting to look like a boat now!
More Fine Tuning
After filling the weave and making things smooth, I've had to do some fairing work on a few trouble spots. The main areas are on the hull's shear panels where the panels didn't quite line up in the scarffing process. As I would run my hands along the hull, I would feel a definite bump in a few of these areas. I used epoxy and micro-balloons as my fairing compound, and then used a long batton to get a fair curve on the hull. After sanding these areas I was very happy with how everything smoothed out.
Subscribe to:
Posts (Atom)


